 Malunggay Compass
- Postharvest handling
- Drying — the critical step
- Moisture, water activity & shelf life
- Milling & powder production
- Powder quality standards
- Seed oil (ben oil)
- Seeds for water treatment
- Product portfolio — ladder & process guides
- GMP: hygiene & facility checklist
- Packaging tiers
- Packaging & FDA compliance
1. Postharvest handling
Leaves begin losing quality the moment they are cut. Heat, bruising, and delay are the enemies — everything in this section is about buying time and losing less.
Fresh malunggay leaf is a living, respiring, high-moisture product: roughly 75–80% water at harvest, with thin cuticles and no rind to protect it. So it heats up fast, wilts fast, and spoils fast. A processor has only a few hours to turn a perishable leaf into a stable powder — and the quality of that powder is decided almost entirely inside that window, long before the mill is switched on.
The five rules, in brief
Cut cool
Harvest in the early morning; leaf temperature is lowest and turgor highest. Midday-cut leaves wilt and yellow faster.
Shade immediately
Move harvested branches under shade within 30 minutes. Never leave harvested material in the sun or in closed, hot vehicles.
Strip gently
Strip leaflets from tender stems by hand or with food-grade stripers. Stems are useful for compost and for drying as “twig tea,” but they dilute powder quality — remove most of them.
Wash right
Rinse in clean water; a dilute food-safe sanitizer rinse (e.g., chlorinated wash water at approved concentrations) followed by potable rinse is standard practice for processors. Drain and air-dry surfaces before drying.
Same-day drying
From cut to dryer within 4–6 hours maximum. Every extra day at ambient temperature costs color, nutrients, and shelf life.
The postharvest clock
Think of postharvest as a countdown rather than a checklist. Each stage has a window, and overrunning it causes a loss that is permanent — you cannot dry your way back to green.
Harvesting: what to cut, and how
- Cut branches, not leaflets. Take stems at 45–60 cm from the ground — the stump rule in the Cultivation Guide — and strip at the processing point. Field stripping doubles labor and exposes bare leaf to sun.
- Leaf maturity matters. Tender young leaflets carry the most protein and the brightest color; old, fully expanded leaves are fibrous, duller, and more bitter. In a well-managed block the 60–75-day cycle delivers mostly young regrowth — one more reason not to stretch the interval.
- Keep soil out. Cut above the soil line and never slash low enough to pick up grit. Soil-borne spores on leaf are a direct route to high mould counts and failed microbiology tests.
- Reject in the field. Leave behind diseased, insect-damaged, and yellowing material. Sorting it out later always costs more than never picking it up.
- Watch the weather. Do not cut immediately before heavy rain if you cannot dry the same day. Wet leaf waiting in a rainy-season queue is where most smallholder batches are lost.
Field handling and transport
| Practice | Why it matters |
|---|---|
| Shallow, vented crates or baskets (no deeper than ~30 cm) | Prevents compression bruising and lets respiratory heat escape; deep sacks self-heat and blacken leaf within hours |
| Shade cloth over the load, raised clear of the leaf | Blocks direct sun on the trip — a tarp laid flat on top is worse than nothing because it traps heat |
| A dedicated, clean vehicle or trike bed | Prevents cross-contamination from fuel, livestock, or manure, a documented microbiology and allergen risk |
| Weigh and tag each load at the gate | Field-to-facility weight is your yield record and your loss baseline; without it you cannot see where tonnage disappears |
| Never stack wet or already-warm material | Fermentation begins in minutes in a warm pile; the smell is the first sign, and by then the color is already gone |
Distance is a quality decision, and it belongs in your business plan rather than in the driver's judgement on the day. As a rule of thumb, every hour of unshaded ambient transport in Philippine daytime conditions costs visible color and measurable carotene. If your block sits far from the dryer, invest in a field-side shade shed and a small dryer before you invest in more hectares.
Stripping and threshing
- Strip at the facility, in shade. Hand-stripping runs roughly 15–30 kg of fresh leaf per person-hour, which makes it the labor bottleneck of most small operations. Plan the crew around the harvest day, not the other way round.
- Target a high leaf-to-stem ratio. Stems carry far less protein and carotene than leaflets and make powder look and taste woody. Tender green petioles are acceptable; thick, woody stems and main branches are not. When a buyer specifies stem content — commonly 5–10% or less — this is what they are testing.
- Set mechanical stripers gently. They lift throughput considerably, but aggressive threshing tears and bruises leaf, and bruised leaf oxidizes to brown during drying.
- Never strip onto the ground. Work over clean tarps or tables. Foreign matter — grit, twigs, insects, plastic — is the most common cause of a rejected batch and is entirely preventable.
- Keep the byproduct. Stems and rejected leaf are not waste: they compost back to the block, feed livestock, or in larger operations dry separately as “twig tea.”
Washing and sanitation
- Wash only when needed. Clean, dry-season leaf from a well-managed block often needs nothing beyond a light rinse, or none at all. Washing adds water and a drying burden, so do not do it out of habit.
- Use potable water. Wash water is a direct route into your microbiology results; a contaminated well will fail a total plate count no matter how good your dryer is.
- Sanitize, then rinse. For commercial powder, a food-grade sanitizing rinse at approved concentration — for example chlorinated wash water within regulatory limits — followed by a potable rinse is standard. Stay inside your buyer's and the FDA's limits; over-strength sanitizer leaves residues and off-flavors.
- Drain and surface-dry. Shake and drain thoroughly, then let the surface film air off before loading trays. Leaf that goes into the dryer dripping wet simply lengthens the cycle and dries unevenly.
- Do not soak. Leaf sitting in wash water leaches water-soluble nutrients, vitamin C and the B vitamins first. Wash fast, rinse fast, move on.
Measuring moisture: how to actually test it
“Dry enough” is a number, not a feeling — and getting it wrong is the difference between a batch that sells and a batch that grows mould. Buyers test, and so should you.
| Method | How it is done | Where it fits |
|---|---|---|
| Crackle / squeeze test | Squeeze a fistful of dried leaf: it should crumble crisply and rattle, not bend or clump | Instant field check before milling; necessary but not sufficient |
| Handheld moisture meter | Press the probe into a representative sample; take 3–5 readings and average them | The everyday tool — fast and cheap, adequate for batch release if calibrated |
| Oven / loss-on-drying | Weigh a sample, dry at about 105 °C to constant weight, reweigh; the loss is moisture | The reference method for a lab or an exporter's audit trail |
| Salt test (rough) | Mix dry salt through a sample; if the salt cakes or leaf sticks, moisture is still too high | Zero-cost screening where no meter is available |
A handheld meter is only as good as its calibration and its sampling. Test a handful from several parts of every tray or batch — never one spot from the top — and record the reading with the date and the operator's name. When a buyer later disputes a moisture claim, that log is your evidence.
Loading the dryer
- Spread thin and even. A bed depth of roughly 3–5 cm on mesh trays lets air move through the whole mass. Thicker beds dry unevenly — crusted on top, still damp underneath.
- Never compact. Leaf pressed into a dense layer traps humidity and slows the cycle exactly where mould starts.
- Leave airflow gaps. Stagger tray positions and keep space between trays so hot air travels through the stack, not just around it.
- Load in the order you will unload. The first tray in is the first tray out; consistent loading is what makes a large batch uniform.
- Separate wet and dry sessions. Do not top up a running dryer with fresh leaf — it re-humidifies the whole load and stretches the cycle for material that was nearly done.
Cooling, equilibration, and milling
- Cool before milling. Milling hot leaf piles friction heat on top of dryer heat; the powder darkens, aroma volatilizes, and nutrients degrade. Let dried leaf return to room temperature first.
- Equilibrate the batch. Moisture redistributes within dried leaf over a few hours, so a batch reading 6% in one spot may read 9% elsewhere. Rest the dried leaf in a sealed container briefly, then re-check before milling.
- Mill, sieve, and pack without a break. Every hour powder sits open it takes on moisture and odour. This is the milling rule stated as a postharvest flow.
Grading and sorting
Grading is where postharvest discipline turns into a price. Most buyers judge a sample by eye before they ever see a lab result, and the reflex is hard to argue with: bright, uniform, clean-smelling powder gets the order.
| Grade signal | What good looks like | What it indicates |
|---|---|---|
| Color | Bright to medium green, uniform across the batch | Gentle, fast drying; leaf moved quickly from field to dryer |
| Stem content | Low — commonly 5–10% or less, per buyer | Careful stripping; more protein per kilo and better texture |
| Foreign matter | Effectively none: no grit, twigs, insects, or plastic | Ground-level work avoided; clean tarps and sieves used |
| Color uniformity | No brown or olive patches, no scorched flecks | Even bed loading and controlled temperature, with no hot spots |
| Aroma | Fresh, mild, green, “alfalfa-like” | Correct drying; a burnt or musty odour signals a processing defect |
| Moisture | 7% or below, consistent across samples | Real drying rather than wishful drying |
Sort and de-stone at the dried-leaf stage and again after milling. A sieve and a magnet cost little and catch exactly the defects that lose orders.
Storage and shelf life
Powder is hygroscopic and light-sensitive, so storage is really a fight against two things: moisture and oxidation. Both are won with the same three tools — a moisture barrier, darkness, and cool.
| Product form | Packaging | Storage conditions | Practical shelf life |
|---|---|---|---|
| Fresh leaf | Vented crate, damp cloth, cold chain where available | Shade; 5–10 °C if chilled | Hours to a few days — use or process promptly |
| Whole dried leaf | Sealed food-grade bag or sack with a liner | Cool, dark, dry, away from strong odours | Months — outlasts powder thanks to less exposed surface area |
| Leaf powder | Moisture-barrier, opaque pouch or jar, heat-sealed | Cool, dark, dry — not the shelf above the stove | Best within months of milling; color and aroma fade with age |
| Capsules / tablets | Sealed bottle with desiccant | Cool, dark, dry | Per the label claim; keep the desiccant in the bottle |
| Seed oil | Dark glass, tightly capped, minimal headspace | Cool and dark; refrigerate for long storage | Shorter than powder — oils oxidize and turn rancid |
Put the milling date on every pack and ship oldest-first. A batch record tying a pack date to a moisture reading and a leaf source is what turns a food-safety scare from a business-ending event into a traceable, contained one — the same discipline the compliance section requires for labels.
Where postharvest losses actually happen
Postharvest loss in smallholder moringa is rarely one dramatic failure; it is a series of small leaks. Knowing where they occur is the cheapest quality upgrade available.
| Loss point | Typical cause | What it costs | Fix |
|---|---|---|---|
| Field | Late or rough cutting, soil contact, material left in the sun | Weight and color lost before the leaf leaves the farm | Morning cuts, branch harvesting, shade within 30 minutes |
| Transport | Deep sacks, no shade, long distance, wet leaf stacked | Self-heating, bruising, browning, mould | Shallow vented crates, raised shade cloth, short trips, field-side shed |
| Stripping | Ground-level work, careless separation, incoming foreign matter | Rejected batches, high stem content, lower grade | Clean tarps and tables, trained crew, sieve and magnet |
| Dryer | Overloading, high or fluctuating temperature, drying well past done | Scorched or unevenly dried leaf; nutrient loss | Thin even beds, 40–55 °C, a moisture check on every batch |
| Storage | Open packs, humidity, heat, light, poor rotation | Moisture regain above 10% — the aflatoxin zone — plus fading | Sealed barrier packs, cool dark storage, first-in-first-out |
Every row above is also a price row. A buyer who finds grit, high stem, brown patches, or a failed moisture test discounts the whole lot — which is why the economics chapter treats postharvest discipline as a margin decision rather than a farm-hygiene chore.
2. Drying — the single most quality-critical step
The objective: take leaflets from ~78% moisture to < 7–8% moisture quickly, at moderate temperature, in the dark or dim light, with clean airflow.
| Method | Conditions | Quality outcome | Suitability |
|---|---|---|---|
| Shade drying (racks, airy room) | Ambient, 2–4 days | Good color and nutrients if humidity is low; risk of mold in rainy season | Small batches in dry months |
| Direct sun drying | Full sun on mats/tarps | Fast but bleaches color, loses vitamins, dust/pest exposure — unacceptable for premium powder | Avoid for commercial powder |
| Mechanical / dehydrator | 40–55 °C, controlled RH, forced airflow, 4–12 h | Best control; uniform, food-safe; retains color and most nutrients | The standard for commercial powder |
| Greenhouse/solar hybrid dryers | 40–60 °C achievable, protected from dust and rain | Good quality, low energy cost | Excellent mid-size option in the PH |
| Freeze-drying | Sublimation at low temp | Top nutrient and color retention; expensive equipment | Niche premium/extract makers |
Research on moringa drying shows the sweet spot around 50–55 °C: fast enough to stop enzymatic degradation and microbial growth, gentle enough to preserve protein, minerals, and much of the carotene. Higher temperatures darken powder and degrade vitamins; lower temperatures (long shade drying) risk mold when humidity is high — the classic Philippine problem during the rainy season.
Poorly dried or badly stored moringa can develop mold and aflatoxins, which buyers test for. Moisture above ~10% in storage invites trouble. Dry to < 7–8%, cool it, and seal it. No exceptions.
3. Moisture, water activity and shelf life
“Dry enough” is not a feeling. Two numbers decide whether your powder is a stable product at twelve months or a mould farm inside a sealed bag — and only one of them is the number most small processors actually measure.

Moisture content and water activity are different measurements
Moisture content is how much water the powder holds, as a percentage of its weight. Water activity (aW) is how much of that water is free — available for microorganisms to grow in. Two batches can read the same moisture percentage and behave completely differently, because in one the water is bound to fibre and starch, and in the other it is loose. Water activity, not moisture, is what actually governs spoilage.
That is the oven or dry-weight method, the reference measurement behind every moisture figure quoted in this knowledgebase. A handheld moisture meter reads faster and is fine for process control, but it should be calibrated against the oven method — and it is not a release measurement on its own.
| Measurement | Target for leaf powder | What it actually controls |
|---|---|---|
| Moisture content | ≤ 7–8% (food grade); ≤ 10% for feed-grade meal | Weight stability, caking, and how quickly the product degrades in storage |
| Water activity (aW) | Below about 0.6 | Whether mould, yeasts and bacteria can grow at all. This is the food-safety number |
| Colour | Bright green, not olive or brown | Chlorophyll retention — a fast proxy for how hot and how slow your drying was |
| Retention sample | One sealed sample per lot, dated | Dispute defence, and your only real shelf-life data |
What actually shortens shelf life
- Free water. Above roughly 0.6 aW, mould growth becomes possible; under-dried or damp-stored powder is where aflatoxin risk enters. This is the same failure that ends a feed business (see feed risks).
- Heat during drying and milling. Colour is the cheap indicator. Leaf dried or milled too hot browns quickly, and the same heat that browns chlorophyll degrades the vitamins you are selling.
- Packing warm powder. Milling while still warm traps humid air against the powder; it condenses as the pack cools. Cool to room temperature before the pack is sealed.
- Light and oxygen. Clear packaging on a sunlit shelf fades colour and aroma faster than anything else you control. This is the practical argument for the packaging tiers below.
- Re-opening. A resealed retail pack is not a sealed one. Every time a consumer opens the bag, moisture and oxygen go in.
What storage does over time
| Storage condition | Around 6 months | Around 12 months | Beyond |
|---|---|---|---|
| Cool, dark, moisture-barrier pack, sealed | Colour and aroma largely intact | Slight colour fade; flavour still sound | Gradual decline — usually still saleable while the seal holds |
| Ambient, low-barrier or repeatedly opened packs | Noticeable fade and aroma loss | Browning, caking, flat flavour | Quality loss is the main risk; mould if moisture climbs |
| Warm, humid, or clear packaging in light | Rapid browning and aroma loss | Likely unsaleable | Mould and food-safety risk, not just quality loss |
Seal one sample from every lot, label it with the lot code, and open one at three, six and twelve months to judge colour, aroma, caking and moisture. A year of that gives you a defensible shelf-life claim and a marketing asset — most competitors have no such data and simply print a date. Pair it with the per-lot testing described in compliance: the COA releases the lot, the retention sample proves how it ages.
4. Milling and powder production
Crackle test first
Dried leaflets should crumble crisply in the fist. If they bend, they are not dry enough to mill — return them to the dryer to avoid caking and mold.
Mill cool and clean
Use a dedicated comminuting mill or hammer mill with clean sieves. Mill in short bursts to keep temperature down; heat during milling degrades nutrients and darkens color.
Sieve to spec
Common commercial specs: 40–80 mesh for powder, finer for capsules. Follow your buyer's mesh requirement; record every batch's mesh.
Moisture check
Use a moisture meter; target ≤ 7%. Record the reading per batch — buyers and auditors will ask.
Pack immediately
Food-grade, sealed bags (LDPE/PP with zipper or heat-sealed), then into cartons. Powder absorbs moisture and odors — do not store open.
5. Powder quality standards
| Parameter | Typical spec (good commercial powder) | Why it matters |
|---|---|---|
| Moisture | ≤ 7% | Shelf life; mold/aflatoxin prevention |
| Color | Bright to medium green | Direct signal of gentle drying; buyers sort by eye first |
| Aroma/taste | Mild, green, “alfalfa-like” | Burnt or musty odor = processing defect |
| Mesh / particle size | Per buyer (commonly 40–80 mesh) | Consistency for blending and encapsulation |
| Protein | 22–28% | Core nutritional spec |
| Microbiology | TPC, yeasts/molds, coliforms, Salmonella absent | Required by institutional and export buyers |
| Heavy metals | Within FDA/import-country limits (Pb, Cd, As, Hg) | Test if sourcing from roadside or industrial-adjacent fields |
| Aflatoxin | Below regulatory limits | Wet-season risk; prevent via drying discipline |
Something wrong with your powder? A dull colour, a musty smell, clumping or grit each point at a different step — drying, milling heat, or storage. Most faults come from three places, and each one has a different fix.
6. Seed oil (ben oil)
- Composition: kernel oil is ~70% oleic acid — a stable, long-shelf-life oil historically used in watchmaking, perfumery, and fine cosmetics.
- Extraction: shell seeds → optional kernel roasting (flavor) → screw press or solvent extraction → filter. Cold-pressed, filtered oil commands the premium.
- Yield math: seeds are ~30–40% kernel oil; a hectare devoted to seed might produce only 100–300 L oil — which is why ben oil is expensive and the market is small but lucrative.
- By-product: the press cake is still protein-rich and coagulant-active — usable for water treatment or animal-feed research, subject to safety review.
7. Seeds for water treatment
Crushed mature seeds release cationic proteins that bind silt and bacteria, clumping them for removal — a classical low-cost clarification aid studied since the 1970s and used in some rural water systems.
- Preparation: shell, crush kernel, mix with a little clean water to form a suspension, stir into turbid water, agitate, then let flocs settle.
- Effect: can reduce turbidity dramatically and reduce bacterial load substantially (it is not a complete disinfectant — always boil or additionally disinfect drinking water).
- Relevance to farmers: a possible institutional/NGO market for mature seed — small volumes, but genuine.
8. The product portfolio
Not all moringa products are equal first ventures. The ladder below ranks the portfolio by capital, skill, and compliance burden — start where your money, equipment, and buyers actually are, and climb one rung at a time. Each product then gets a full process walkthrough.
| Rung | Product | Capital | Skill & equipment | Compliance | Margin & market |
|---|---|---|---|---|---|
| 1 | Fresh leaves & pods | Minimal | Field skills you already have | None (raw produce) | Low margin, dependable palengke demand |
| 2 | Dried leaflets / rustic tea | Low | Air-drying racks, patience | None if sold loose | 2–3× fresh; neighbors and pasalubong buyers |
| 3 | Milled powder | Low–mod | Mechanical dryer + mill + moisture meter | FDA registration for packed retail | Core volume product, ₱300–800/kg wholesale |
| 4 | Tea bags & blends | Mod | Blending, sealing machine, tea-bag machinery (or hand-fold) | FDA registration | Gift/retail channel, strong brand potential |
| 5 | Fortified foods | Mod–high | Bakery or co-manufacturing partnership | Per food category | Institutional + retail; volume via partners |
| 6 | Cosmetics & soap | Mod–high | Formulation skills, oil press or purchased oil | FDA cosmetics notification | Premium niche, brand-driven |
| 7 | Oil & capsules | High | Oil press, encapsulation, stricter QC | Highest in portfolio | High ₱/unit, small volumes, export-capable |
Each rung funds the next: tea money buys the dryer, powder money buys the sealing machine, powder contracts finance the encapsulator. Skipping rungs usually shows up as unsold inventory or failed buyer audits, not faster growth.
Unsure which rung is yours? Three questions about your capital, your drying capacity and your buyer point at the product that fits — and at the rung after it.

🍵 Tea & dried leaflets — full process
1) Strip leaflets from tender stems; discard yellows. 2) Wilt 2–4 h in shade to soften grassy notes. 3) Dry at 40–50 °C to ≤ 8% moisture (drying specs). 4) (Optional) blend with dried lemongrass or ginger at 20–40%. 5) Cut or leave whole-leaf; fill heat-sealed bags or 20–50 g pouches. 6) Label & date every batch with lot number. Key control points: moisture ≤ 8%, mold-free aroma, consistent blend ratios per lot.

🥤 Powder — full process
1) Harvest young (60–75-day flushes) and process same-day. 2) Strip & wash per postharvest protocol. 3) Dry 50–55 °C to ≤ 7% moisture. 4) Mill cool in short bursts; sieve to buyer mesh (40–80). 5) Batch-test moisture, color, aroma; retain a sample of every lot. 6) Pack bulk or retail per packaging tiers. Key control points: ≤ 7% moisture, bright green color, mesh consistency, lot traceability, COA-ready samples.

🍵→🫖 Tea bags & blends — full process
1) Produce base powder/leaf (rung 3 quality). 2) Formulate blend ratios by weight (e.g., 70% moringa / 30% lemongrass) and record the recipe. 3) Blend in a rotating drum or by layered hand-mixing; rest blended leaf 24 h for aroma marriage. 4) Fill tea bags by machine or hand-folded filter paper; overwrap. 5) Box with FDA-compliant labels; register the SKU. Key control points: ratio accuracy ±2%, sealed bags, box counts, sensory consistency across lots.

🍞 Fortified foods — full process
1) Standardize powder (mesh, moisture, micro specs) to the partner's acceptance. 2) Agree fortification % — typically 3–5% for pandesal/noodles (see the conversion tables). 3) Co-manufacture via a licensed bakery or FDA-licensed plant; your powder is the ingredient, their line is the factory. 4) Run acceptance batches — taste panels, color checks, shelf-life sampling. 5) Scale under contract with agreed pricing (cost-plus floor: pricing method). Key control points: powder consistency, fortification verification, partner's FDA license currency.

🧼 Soap & cosmetics — full process
1) Choose base: melt-and-pour soap base (beginner) or cold-process (experienced). 2) Incorporate 1–5% moringa powder (color/mild exfoliant) or ben oil (superfatting, 3–8%). 3) Mold, cure 4–6 weeks for cold-process. 4) Wrap with ingredient INCI lists. 5) Notify FDA as cosmetics. Key control points: stable color (powder can brown in high-pH soap), consistent weights, batch records, no therapeutic claims.
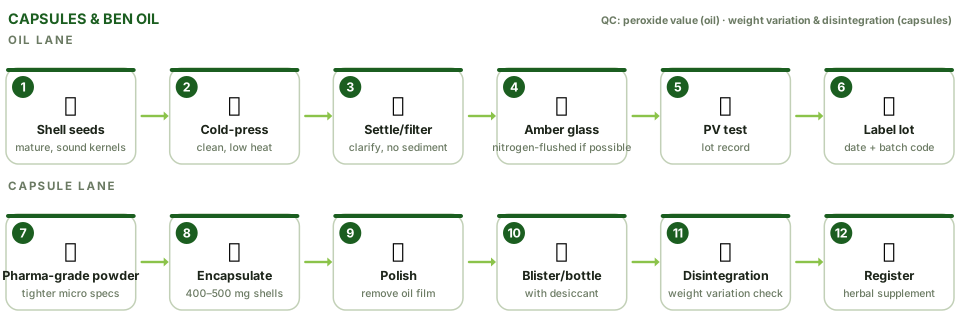
💊 Capsules & oil — full process
Oil: shell mature seeds → cold-press kernels → settle/filter → amber glass, nitrogen-flushed if possible → lot-test peroxide value. Capsules: pharmaceutical-grade powder (tighter micro/heavy-metal specs) → encapsulate 400–500 mg → polish, blister or bottle with desiccant → register as herbal supplement. Key control points: seed quality, pressing hygiene, peroxide value (oil), weight variation & disintegration (capsules), full COAs per lot.
9. GMP: hygiene and facility checklist
Good Manufacturing Practices (GMP) is the bridge between farm-made and factory-made. FDA inspectors — and serious buyers — will walk your facility against points like these:
| Area | What inspectors and buyers look for |
|---|---|
| Site & layout | Clean surroundings, no flood exposure, logical flow raw→wash→dry→mill→pack (no backtracking), separate hand-wash and equipment-wash areas |
| Surfaces & equipment | Food-grade contact surfaces (stainless, food-grade plastic), smooth cleanable tables, no rusty or splintered tools, documented cleaning schedule |
| Personnel | Health certificates, hairnets/masks/aprons, no illness policy, handwashing discipline, training records |
| Pest control | Screens, traps with logs, no open windows near packing, zero evidence of rodents/insects in product zones |
| Water & waste | Potable water for washing (tested), proper drainage, waste away from product flow |
| Storage | Pallets/furniture off floor, sealed labeled containers with lot numbers, FIFO stock rotation, temperature/humidity awareness |
| Records | Batch logs (source, date, moisture, yield), cleaning logs, worker health records, buyer complaints file |
GMP costs almost nothing to start — a logbook, soap, screens, and labels — and everything to retrofit under inspection pressure. Rural SSEs that keep records from their first kilo find FDA licensing and buyer audits straightforward.
10. Packaging tiers
| Tier | Format | Use | Approx. cost |
|---|---|---|---|
| Tier 1 — Bulk | Food-grade LDPE liner in woven sack or sealed HDPE bucket, 5–25 kg | Sales to processors/brands | ₱5–15 / kg |
| Tier 2 — Retail pouch | Stand-up pouch with zipper + desiccant, 50–250 g, printed label | E-commerce, groceries, pasalubong | ₱3–12 / pack |
| Tier 3 — Premium | Amber glass jar or canister, tamper seal, premium print | Gift/health-store channel | ₱25–60 / unit |
| Tier 4 — Supplement | Blisters or bottles of capsules with desiccant neck-seal | Pharmacy/herbal channel | ₱5–15 / bottle + capsule costs |
- Moisture barrier is non-negotiable: powder moves from ≤7% moisture to clumpy and musty quickly in cheap packaging — the desiccant and the seal do more for shelf life than the label does for sales.
- Label per FDA rules (next section) on every tier destined for sale.
11. Packaging, labeling & FDA Philippines compliance
Selling packaged moringa products legally in the Philippines means dealing with the Food and Drug Administration (FDA) and, for organic claims, accredited certifiers:
- Business registration: DTI (sole prop) or SEC (corporation), then Mayor's Permit and BIR registration — the foundation for everything else.
- FDA product registration/notification:
- Processed foods (powder, tea, fortified foods): FDA Certificate of Product Registration (CPR) with a licensed food manufacturer/processor setup and product specifications.
- Herbal/food supplements (capsules): registered as such, with allowed claims only.
- Cosmetics (soap, oils, creams): notification route.
- Labeling: product name, net content, ingredient list, name/address of manufacturer/distributor, lot number, expiry/best-before, and FDA registration number where applicable. No disease-cure claims — ever.
- Organic certification: third-party certification per RA 10068 (Organic Agriculture Act, as amended) for “organic” claims; Participatory Guarantee Systems (PGS) are recognized for domestic markets. Transition takes 2–3 years.
- GAP certification: Good Agricultural Practices certification strengthens buyer confidence for fresh produce channels.
- Export paperwork: for exports, add BPI plant quarantine/phytosanitary certification and destination-country requirements (e.g., US FDA facility registration, EU organic equivalence).
Secure a co-packing arrangement with an FDA-licensed manufacturer while building your own facility. Many successful moringa brands started that way — brand and market first, factory later.
Who buys and how the industry is organized: Industry & Policy. Common questions: FAQ & Help.